Action center
Overview
Action Center provides you with a list of recommendations that you can implement to improve the efficiency of your ActiveBatch environment. The recommendations are modeled after information that is provided in the Health Service’s Health Check report. The Health Check report is divided into Key Success Factors (KSF’s) such as maintainability and database health. Within each KSF you will find an overview, contributing factors, maturity level and recommendations. Building off of this concept, the Action Center transposes the KSF recommendations into smaller logical units called “Action Center Cards”, where each Card falls within one of the KSF categories. Much like the Health Check report, each Action Center Card offers an overview, contributing factors and recommendations. The key difference between the Health Check report and the Action Center is Action Center offers features and/or links to resources that will assist in the implementation of the recommended changes. Once you make the necessary change(s), you can mark the Action Center Card complete.
Prerequisites
- ActiveBatch Health Service (required). As of V12 SP8 and higher, Health Service is installed on the Job Scheduler server by default; therefore you are no longer required to perform a separate installation and configuration.
-
Email Client (optional): If you wish to contact ASCI Customer Success regarding any Action Center recommendations, you will need an email client configured on the system where the ActiveBatch console is installed.
Note: Action Center data is automatically updated every week, a frequency that allows you to stay on top of maintaining an optimized ActiveBatch environment.
Accessing Action Center
To access the Action Center view, navigate to the Views pane and click on Action Center.
What you see next will vary depending on the state of Health Service (the above described prerequisite). Let’s go over what the possibilities are.
-
Health Service Not Installed <Critical>
-
Remedy: Install the Health Service. This component is required to generate Health Check reports and Action Center data. A useful link that accompanies this message will take you to ASCI’s Product Updates web page. Login to MyASCI and download the Health Service installation kit. Install Health Service on the Job Scheduler server.
-
Note: As of V12 SP8, the above message will not appear since Health Service is installed automatically and no longer requires a separate installation, as it did in V12 SP7 and earlier. In addition, starting with 2023, the Health Service installation kit is not available as a separate download for this version.
-
-
-
Health Service Not Running <Critical> - This means the Health Service has been installed but the service is not currently running.
-
Remedy: Start the Health Service by clicking on the Start Health Service button that is conveniently accessible on the Action Center page.
-
-
Welcome to the Action Center. There are no evaluations yet. Please check back in a week.
-
As the message indicates, check back in a week for recommendations. This message is seen only once - after a new installation of Health Service. The data required for Action Center will automatically be provided through Health Service, based on an internal weekly schedule. There is nothing more for you to do.
-
-
Thanks for keeping up with best practices and taking good care of your ActiveBatch environment. Based on our last evaluation, everything is optimized.
-
Congratulations! As stated, this means your environment is fully optimized. Check back weekly to see if there are any new recommendations.
-
-
The Action Center has one or more recommendations.
-
When this is the case, you will see Action Center Card(s), one for each recommendation. This documentation does not list and describe each Action Center Card. They are typically self-explanatory, and if more information is needed, many Cards include various links to resources that will assist you in acquiring knowledge about the Card’s topic.
-
Action Center UI Overview
The image below is an example of what the Action Center interface will look like when an evaluation of your environment results in one or more Action Center Cards. Let’s start by discussing the Action Center’s header bar, toolbar, and footer bar.
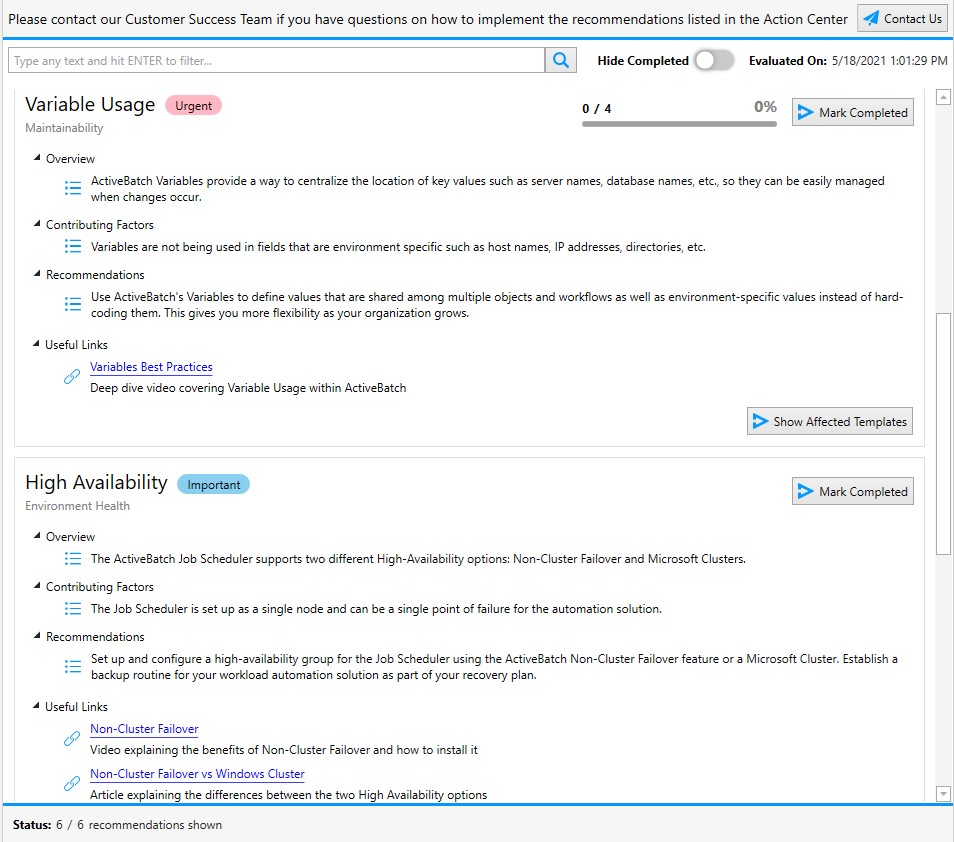
Action Center Header Bar
Contact Us
This button will send out an email to ASCI’s Customer Success Team. It should be used when you have any questions regarding the Action Center’s recommendations.
Action Center Toolbar
Search
The search filter allows you to narrow down what Action Center Cards you wish to see in the view.
The text on the front of each Card is searchable. Enter a word or phrase (case-insensitive) to search for. Press the <Enter> key or click the Search icon to apply the search. Only Cards that have matching text will be displayed in the Action Center view. The matching text is bolded. After a search filter has been applied, you will see the search text that was previously entered circled and placed under the search textbox. As depicted in the image below, the search text entered was “Urgent”, therefore the Action Center will only display Cards that have a status of Urgent. To remove the search filter, click on the X to the right of the search text. The view will automatically refresh

You can enter more than one search value. Please enter them one at a time. Action Center Cards that have either value will be a match.
Hide completed – disabled by default
On each Action Center Card, you can mark the Card completed when the recommendation has been implemented. Completed Cards can be hidden in the view by enabling the “Hide completed” feature. To enable it, click on the Hide completed icon to the right of the label. The icon’s background color will change from gray to blue and the Completed cards will be hidden. To disable the feature, click on the icon again, and it will toggle back to disabled.
Evaluated On
This field specifies the date and time of the last evaluation – which is managed under-the-hood by ASCI. Currently, new Action Center evaluation data is made available weekly.
Pull New Evaluation
This button is only visible in the toolbar when the Action Center is open and new evaluation data arrives. See the image below.

If you click on the button, a confirmation message will pop-up as follows:
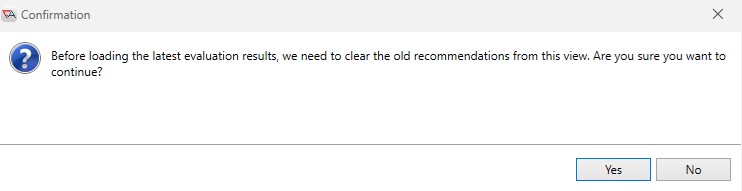
Click on Yes or No. Keep in mind that with a Yes response, you may see one or more Cards that were in prior evaluation(s) if:
-
Changes were made in your ActiveBatch environment between evaluations – resulting in the recommendation again.
-
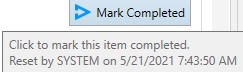
A Card was marked complete but the actual work was not done. When this happens, the status of the Card will revert from “Completed” to “Mark Completed”. If you mouse over the Card’s Mark Completed button, you will see a tooltip message as depicted in the image below. Notice the text, “Reset by System”. This indicates the Card was previously marked completed, but the recommended action was not implemented.
After new data is pulled in, the Pull New Evaluation button is removed from the toolbar and replaced with a new “Evaluated on” date and time.
Action Center Footer Bar
Status: This field indicates how many recommendations are current being displayed (1st number), and how many recommendations there are in total (2nd number). Action Center Cards that are not being displayed have either been marked as completed and “Hide completed” is enabled, and/or they have been filtered out because they do not meet Search filter criteria that is currently being applied. In the example below, 3 cards are currently visible out of a total of 6.

Last Saved: The Last Saved field displays the date and time a Card’s status was last updated during the current Action Center session. This field is initially not displayed when the Action Center view is opened. The field appears and is updated with the date and time a user marks a Card completed, or reverts a completed Card back to New (incomplete). See the header below: Mark Completed/Completed for more details on updating the status of a Card.
Let’s look at details regarding Action Center Cards.
Action Center Cards
Action Center Cards are the recommended optimization changes, sorted by priority, where “Urgent” Cards are listed at the top. The order of the cards is not user configurable. Other statuses include critical, important, and recommended. Completed cards are always at the bottom of the view, visible when “Hide Completed” is disabled. An outline is drawn around each Card, to delineate one Card from another.
Each Card includes:
-
A heading that identifies the feature that the recommendation is referring to
-
The name of the Key Success Factor (KSF) the Card is associated with
-
An Overview that provides a brief synopsis of the feature that correlates to the recommended change
-
Contributing Factors as to why the change is recommended
-
Recommendations on how to resolve the suggested change
-
A button whose label is either “Mark Completed” or “Completed”
Some Cards include:
-
Useful links to:
-
Training videos
-
Knowledgebase articles or other published documents
-
Graphs
-
-
A button named “Show Affected Templates”
-
A button named “Open Property Sheet”
Mark Completed/Completed
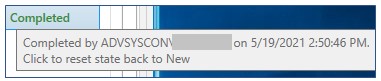
When a recommendation is completed, click on the “Mark Completed” button. The button’s label will turn green and its text will change to “Completed”. In addition, the Card will be moved to the bottom of the list. The completed Card will be visible providing the “Hide Completed” feature is not enabled. If you mouse over the Completed button, a tooltip will pop up identifying the user who marked the Card complete, and the date and time this event occurred (see image below).
The Completed button’s tooltip also indicates that you can click on the Completed button if you wish to reset the state back to New. If that action is taken, the Card’s location will be adjusted based on its status, and the button’s label will revert to “Mark Completed”. When a completed Card is reverted to “Mark Completed”, a reset message will be included in the button’s tooltip, displaying the name of the user who performed this action, and the date and time the event occurred (see image below).
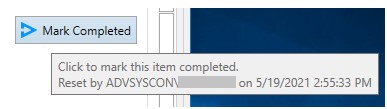
If a Card is reverted to “Mark Completed” by the system, the tooltip will state “Reset by the System” on <Date/Time.>. A Card will be reset by the system if a user marked it completed, and the next time an evaluation is done, it was determined the task required to resolve the recommendation was not implemented.
Open Property Sheet
This button will appear on a Card when the recommendation involves a single ActiveBatch object. When a user clicks on this button, the object’s property sheets will be opened and tabbed in the Console’s Main view. This behavior mirrors what happens when you double-click on a Job object in the Object Navigation Pane.
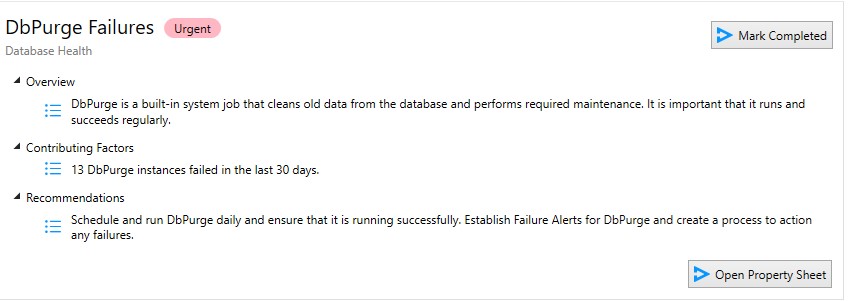
Let’s look at an example that includes the “Mark Completed” and “Open Property Sheet” buttons. In the image below, we see a Card that is addressing an urgent issue – “DbPurge Failures”. The KSF this falls under is Database Health. The “Overview” describes what DbPurge is, in the event a user was uncertain of its purpose. The Card’s “Contributing Factors” state that DBPurge has failed 13 times in the last 30 days. This is what needs to be investigated and corrected. The “Recommendations” primarily focus on managing failures going forward. It may be necessary for you to look at failed DbPurge instances, most pointedly the Job log file, to assist in troubleshooting this issue.
If you would like to view and/or change the properties of DbPurge, click on the “Open Property Sheet” button. In the case of DbPurge, this is quite handy as you may not know where the Job is located, since it is built-into the product.
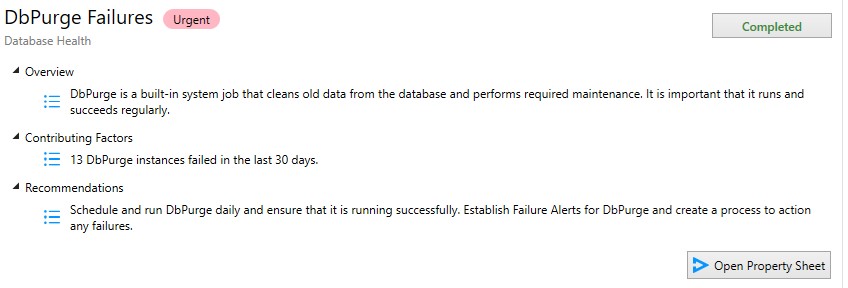
After the DbPurge issue has been resolved, click the Card’s “Mark Completed” button as depicted in the image above. In the image below, you will see what has changed after marking the Card complete. The text of the button has changed to “Completed”, the label is now green, and the Card is moved to the bottom of the Action Center’s list.
Show Affected Templates
When this button is selected, the original Card text (Overview, Contributing Factors, etc.) will be replaced with a list of Templates that require updating in order to complete the Card’s recommendation.
Let’s look at an example.
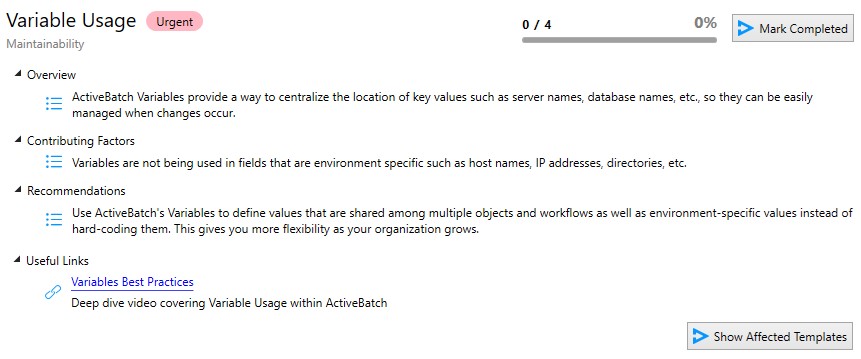
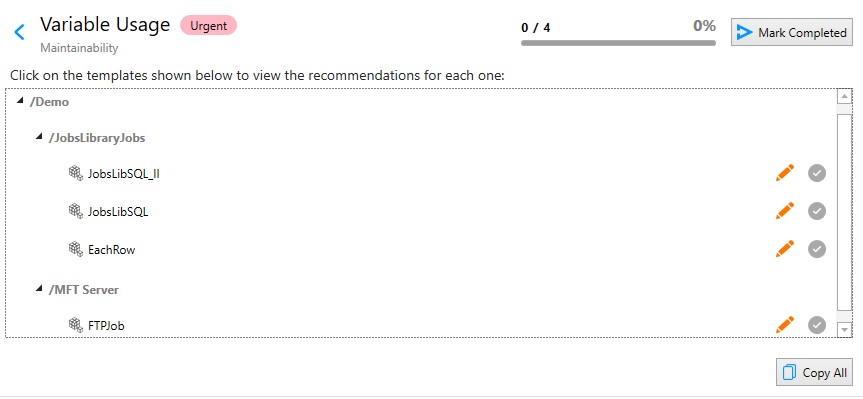
The Variable Usage Card depicted in the image below consists of a recommendation to use Variables when configuring property values that are environment-specific and/or shared.
Observe that this Card has the “Show Affected Templates” button. In addition, there is a progress bar indicator that is displaying 0 / 4 and 0%. This means that there are 4 templates that are affected (need to be updated), and 0 have been changed thus far, therefore 0% is complete.
When Show Affected Templates is clicked, you will see something similar as depicted in the image below. The Card’s leftmost side is representative of the Object Navigation pane’s tree structure, but it is only displaying the containers where there are Jobs that need to be modified. There are one or more hard-coded property values in each Job that needs to be replaced with a variable. Observe the “Copy All” button in the image below. When selected, it will copy information about each Job, allowing you to paste it into a target application (e.g. a document, Email body, etc.). Observe in the image where it states, “Click on the templates shown below to view the recommendations for each one.” Some Cards will include this option.
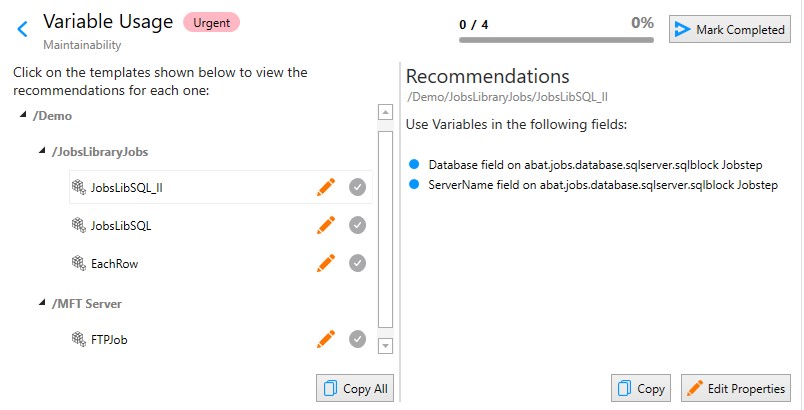
When you click on any one of the four Job templates, additional information about what property(s) to update will appear, as depicted in the image below. In this example, JobsLibSQL_II is the selected Job. Notice on the right side of the image, you see two bulleted items which are the fields used in the Job that should be replaced with variables. To edit the properties, click on the Edit Properties button, or click on the pencil icon to the right of JobsLibSQL_II. Either way, the property sheets for the selected Job will be opened and tabbed in the Main view.
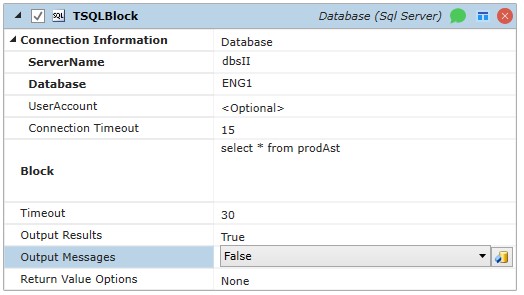
The image below depicts the Jobs Library Job Step that needs to be updated to include variable references instead of the current hard-coded values in the ServerName and Database properties.
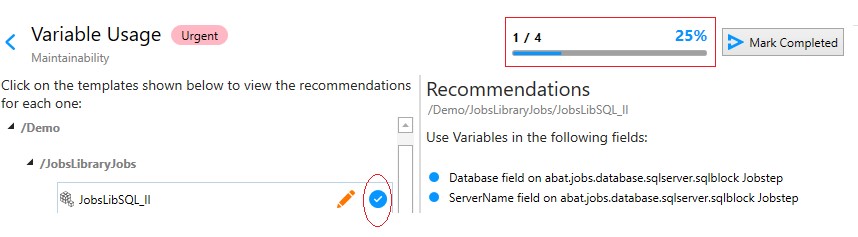
After making the recommended changes, click on the selected Job’s “Mark Completed” icon (see the icon circled in red in the image below) – which is initially gray, but turns blue when completed. When marking the change complete, the progress bar indicator (outlined in red below) will automatically update, where 1 out of 4 (1/4), or 25%, of the recommended changes have been completed. This will help you keep track of what has been completed, for the Card as a whole, especially if you do not complete all the changes in one session.
If you mouse over a Job’s “Mark Completed” icon after it has been completed, you will see a tooltip like one depicted in the image below. The tooltip displays the user who marked it complete, and the date and time. If the state needs to be reset, click on the icon again, and it will toggle back to a New (incomplete) status.

If the status is toggled back to New, you will see something like this when you mouse over the icon:

Notice the “Reset by” text. The tooltip provides you with the latest information regarding actions taken – by who and when.
Note: The individual Job template “Mark Completed” tooltip “Reset by...” statuses are not tracked when new evaluation data is available. It is tracked for the duration of the current evaluation.
When all four Jobs are updated with variables and marked complete, the status indicator will be 100% and the “Mark Completed” button in the upper right-hand corner will be highlighted as a reminder to mark the entire Card complete. The next time the Action Center data is evaluated, you will not see this Card unless new Jobs have hard-coded property values that need to be replaced with variables.
Moving away from the Variables Usage Card discussion, the Constraint Checks Card also has a “Show Affected Templates” button. Like the Variable Usage Card, you can open the Job’s property sheets, make the recommended changes, and mark each change complete. An additional feature in the Constraints Check Card is depicted as a blue icon, circled in red below.
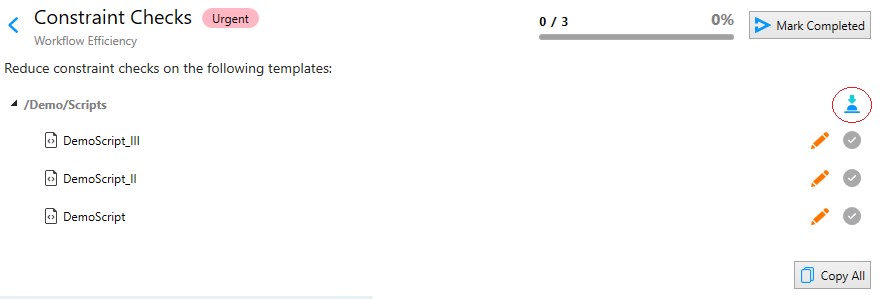
If you mouse over the icon, the tooltip states: “Use Default Policy dialog to push down changes to all children”. This optional feature prompts you to create a Default Job Policy![]() in order to set constraint property values that align with the Card’s recommendation. The Default policy can be used to update (“push down”) the constraint properties for all the Jobs in the /Demo/Scripts container. The Default Policy feature is not specific to Action Center, but rather, the Action Center is providing access to the feature.
in order to set constraint property values that align with the Card’s recommendation. The Default policy can be used to update (“push down”) the constraint properties for all the Jobs in the /Demo/Scripts container. The Default Policy feature is not specific to Action Center, but rather, the Action Center is providing access to the feature.
Job Scheduler Information Page
The Job Scheduler Information, open in the Main view by default, provides the following Health Check information: (see the image below)
-
Number of Action Cards based on priority (this is updated real-time as Cards are marked completed)
-
A link to open Action Center
-
A link to View the ActiveBatch Health Check Report (when a report is available)

There are no security restrictions regarding accessing the Action Center view and updating Card statuses (e.g. Mark Completed). If the Card involves accessing object properties and making changes to objects, the security for the individual objects will apply (e.g. to modify a Job’s properties, you would need read/write and modify permissions granted on the Job object).